Thursday, January 22, 2015

Bannock on a Stick

By Jessi, Olivia and Kyle

Rate: ****
Ingredients:  4 cups flour  4 teaspoons baking powder  1 teaspoon salt  4 tablespoons oil  1 1/2 cup water  Optional: brown sugar, cinnamon, raisins, honey, ...  Instructions:  Mix ingredients and add water until you have a doughy consistency - don't just dump all the water in.  Knead approximately 10 minutes.  Add sugar, honey, or raisins if you want it sweeter.  Grease and heat a frying pan. Form and press the dough into cakes.  Lay the bannock in the frying pan.  As the bannock cooks, move the cakes around so they don't stick.  When the bottom crust has formed and is browned, flip the cakes over.  Cooking takes about 12 minutes.  Sprinkle with honey or brown sugar and eat.  You can mix all the dry ingredients into one bag at home.   Instead of cooking in a frying pan, you form a foot long roll of dough about an inch in diameter and wrap it around a stick. Cook this over an open fire. 

A few things we added in: 
  • 2 cups of bread flour to replace 2 cups of white flour to give the bread more texture 
  • 4 teaspoons of pumpkin pie spice  
  • 3/4 cup brown sugar  
  • 1 and 1/3 cups raisins
We think that the final product turned out great especially with the add ins, we would highly recommend this recipe. For best results spread the dough on a long stick only about 1/2 an inch thick, if it is too wide it will take much longer to cook. This would also taste great with a bit of maple syrup drizzled on top. 

Image 

Reference 
Owlbebak, Outdoor Adventures and Reviews,. 'Collection Of Bannock Recipes'. N.p., 2013. Web. 9 Dec. 2014.http://www.owlbebak.com/2013/06/collection-of-bannock-recipes-campfire.html
 
Pumpkin Pie Bark

By: Lucia and Gillian

Rating: ***

Recipe


The recipe for pumpkin pie bark is written on the website as follows:

Ingredients:

  • 1 15 ounce can pumpkin
  • ¼ Cup real maple syrup
  • 2 tsp pumpkin pie spice (cinnamon, nutmeg, ginger, allspice)
Combine pumpkin with maple syrup and pumpkin pie spice. Use real maple syrup for best results. Stir until ingredients are mixed well. You don't need to use a blender.
Spread thinly (about eighth inch) on dehydrator trays covered with Excalibur Paraflexx® sheets, parchment paper, or the fruit leather inserts that go with your dehydrator.
Dehydrate at 135° for eight hours until brittle.
After about five hours, flip the bark over as follows: Place a spare dehydrator tray on top of the Bark and flip the two trays over so that the bottom side of the bark is now facing up. This will ensure complete drying.
Yield: One 15 ounce can of pumpkin barks down to 1½ cups weighing four ounces.

IMG_8704.JPGIMG_8702.JPGIMG_8750.JPG


No-Crust Pumpkin Pie/ Pumpkin Pie Pudding

Serves 1

Ingredients:

  • ½ Cup Pumpkin Pie Bark
  • ½ Cup water
Pumpkin Pie Bark dissolves in hot or cold water. If you want hot pie or pudding, stir the Bark with hot water until creamy. The mixture comes out to be more like a pudding, however it is thick enough to shape into a wedge of pie.
For larger servings, combine with an equal quantity of water.
Garnish with chopped walnuts or pecans if desired.


Helpful Hints/Our Comments


In our experience of making this recipe, we found that if you make a double batch it will not dehydrate properly. The bark will turn out pliable and harder to chew than it otherwise would have. In our first attempt making the recipe, it also turned out to be too bitter because we forgot to put double the spice mix in. It might also be helpful to check the amount of ingredients required several times so that you do not make the mistake of forgetting or putting less/ more ingredients in than required. You need to be very careful when spreading the mixture out on dehydrator trays. You must make sure that it is no thicker than 3mm (⅛ of an inch), otherwise it won’t turn brittle, but rather chewy. It will also not dehydrate in the time frame that it's supposed to.

For our second batch we used the exact amounts listed on the recipe, and were careful to include all of the ingredients. Instead of the listed 8 hours total to dehydrate, the bark took 14 and a half hours to dehydrate total at the listed 135 degrees Fahrenheit. We ended up flipping the bark at the 8 hour mark.  

Recipe taken from:

Backpackingchef.com,. 'Pumpkin Pie Bark'. N.p., 2015. Web. 22 Jan. 2015.

Dried Mango's

Rating: ***

By: Sam and Sarah 


Recipe


INGREDIENTS

2 ripe mangoes

DIRECTIONS


Wash both mangoes, peel them and remove the skin.


Cut the mango's into thin slices and place them on cookie sheets and a baking pan


Put the mango in the oven and bake for 2-3 hours, flipping them over every 30 minutes until they're dry. 


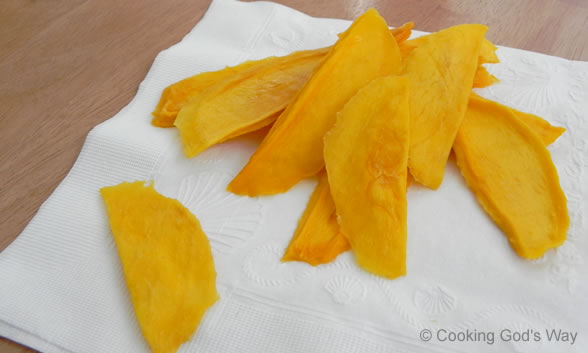
Your final product should look a little something like this:


Next time we would try baking it for it a little bit less time, and using a riper mango

source: "Nature's Candy: DIY Dried Mango." RSS. Web. 22 Jan. 2015. <http://www.popsugar.com.au/fitness/Recipe-Make-Dried-Mango-32540222>.

Lemon Coconut Macaroons

Lemon Coconut Macaroons

Rating: **** Very Good

Ingredients:
  •  3/4 cup almond flour
  • 1 1/2 cups dried, shredded unsweetened coconut
  • 1/4 cup plus 1-2 tablespoons raw honey
  • 1/4 cup coconut oil, gently melted
  • 1 tablespoon lemon extract
  • Pinch of unrefined sea salt


Directions:
  • In a bowl, combine the almond flour, coconut, and salt.
  • Add 1/4 cup plus 1 tablespoon of honey to all of the coconut oil and all of the lemon extract. Mix until well combined.  

Macaroon mixture after all the ingredients have been added

  • Using a rounded “measuring” tablespoon, gently press the macaroon dough into the spoon, then turn the spoon upside down and tap the cookie out into your hand. If it falls apart add one more tablespoon honey. Gently place on a parchment lined baking sheet and repeat with the rest of the dough.  

Macaroons after being formed and placed on cookware

  • Bake in a 195-200F (90-93C) oven for about 45-50 minutes. The outside should be dried out a bit and the inside should be soft and chewy. For raw macaroons, place in your dehydrator until they are slightly dry on the outside, soft and chewy on the inside. Times will vary depending on the dehydrator and temp used.
  • Allow the macaroons to sit for at least 15 minute before transferring. They are delicate while still warm but very sturdy once cooled.  


Macaroons after they have been cooked and cooled
Hints: Instead of using lemon extract, as it is not a common household item, I used the zest of half a lemon to get the lemon flavour in the macaroons. To keep the macaroon mixture sticky, so it would remain together when rolled into balls, I added in an extra half tablespoon and 1 teaspoon of honey to the existing amount. This kept the mixture together and sticky. Instead of baking it at 200ºF, I cooked them at 325ºF for 19 minutes. This made a nice crust on the outside of the macaroons. Then, I turned off the oven and let them sit in the warmth of the oven for another 10 minutes. I took the macaroons out and let them cool for 30 minutes. All these changes helped me create macaroons that were crispy on the outside and chewy on the inside.


Mommypotamus,. 2013. 'Lemon Coconut Macaroons - Mommypotamus', URL : http://www.mommypotamus.com/lemon-coconut-macaroons/, consulté le 12 January 2015.

Beef Jerky Recipe By: Kyle Godin

Spicy Beef Jerky Recipe

Rating: (8/10)

Ingredients:
Yield: 30 strips

The ingredient amounts have been scaled to the new serving size. Any ingredient amounts, cooking times, and/or temperatures referenced in the directions still refer to the original serving size.

  • 1 2/3 lbs London broil beef or 1 2/3 lbs flank steaks
  • 7/8 cup dry red wine
  • 1/2 cup soy sauce
  • 7/8 cup Worcestershire sauce
  • 1/2 cup red wine vinegar
  • 3 1/3 cloves garlic, mashed
  • 7/8 jar red chilli sauce (found in the Asian section of the store)

Directions:

  1. Place the meat in the freezer for an hour or so, until it is very firm—but not frozen—to make slicing easier.

2. With a long, sharp knife, cut the meat into diagonal slices less than 1/4 inch thick.
Lay the slices flat in a large glass or enamel baking dish.

3. Combine the red wine, soy sauce, Worcestershire sauce, vinegar, garlic and chilli sauce

4. Pour over the meat, cover, and marinate in the refrigerator for about 4 hours (overnight works best), turning the slices several times to coat.

5. Remove the meat from the marinade and pat it dry with absorbent paper towels.

6. Arrange the slices in a single layer on wire racks (such as those used for cooling cakes and cookies) and set the racks on foil-covered baking sheets (to catch the drips).

7. Place in a dehydrator at 55* Celsius for about 10 hours, until dry and dark brown, but still pliable.

8. Watch it closely; during the last half hour or so the meat can burn quickly.

9. Let cool completely, then store airtight.

Tip: I would recommend using a Dehydrator over a oven because Dehydrator specialises in dehydration of foods in the end it gives it a better texture and cook on the food. But Instead of cooking for 10 hours I would cook it for 8 hours so it is not as tough to chew.

Wednesday, January 21, 2015

Pumpkin Pie Bark


by: Olivia Georgitsos and Jessi Andersen

Rating: **

Ingredients:

·         1 15 ounce can pumpkin
·         ¼ Cup real maple syrup
·         2 tsp pumpkin pie spice (cinnamon, nutmeg, ginger, allspice)
Combine pumpkin with maple syrup and pumpkin pie spice. Use real maple syrup for best results. Stir until ingredients are mixed well. You don't need to use a blender.

Spread thinly (about eighth inch) on dehydrator trays covered with Excalibur Paraflexx® sheets, parchment paper, or the fruit leather inserts that go with your dehydrator.

Dehydrate at 135° for eight hours until brittle.

After about five hours, flip the bark over as follows: Place a spare dehydrator tray on top of the Bark and flip the two trays over so that the bottom side of the bark is now facing up. This will ensure complete drying. 

Yield: One 15 ounce can of pumpkin barks down to 1½ cups weighing four ounces.


No Crust Pumpkin Pie (to rehydrate your bark if necessary)

Serves 1

Ingredients:
·         ½ Cup Pumpkin Pie Bark
·         ½ Cup water

Pumpkin Pie Bark dissolves in hot or cold water. If you want hot pie or pudding, stir the Bark with hot water until creamy. I use my candle stove to gently warm the water for pumpkin pie.
I eat it like pudding, but the photo shows that it is thick enough to shape into a wedge of pie.
For larger servings, combine with an equal quantity of water.
Garnish with chopped walnuts or pecans if desired.


     Overall, we liked this dehydration recipe. It wasn't one of our all-time favourites, but it wasn't horrible. It wasn't a very common recipe so we were definitely nervous about how it was going to work out. We did have to make some minor modifications to the recipe and cooking instructions. Firstly, instead of cooking the bark at 135 degrees Fahrenheit we cooked it at 170 degrees and we cooked it for a slightly shorter time period. We also added more maple syrup and cinnamon to make the bark taste better and to add flavour. In the process of making our food, we had to convert all of the ingredients measured in ounces to millilitres. The container sizes didn't exactly match up so we had to try to make sure the recipe had about the same ratio of all ingredients. While cooking our bark, we also realized that the quantity of the ingredients we used didn't have to be exact compared to the recipe. 


Backpackingchef.com, (2015). Pumpkin Pie Bark. [online] Available at: http://www.backpackingchef.com/pumpkin-pie-bark.html [Accessed 19 Jan. 2015].

Dried Mangoes

Rating : ***
By Senna and Ashley


Ingredients

2 ripe mangoes

Directions (For the Oven)

  1. Preheat oven to 185ºF or as low as your oven will go. Place a Silpat silicone mat on a baking sheet.
  2. Wash both mangoes, and use a peeler to remove the skin.
  3. Cut into thin slices, and place them on the Silpat.
  4. Put the mango in the oven, and bake for 2 to 3 hours, flipping them over every 30 minutes or until they're dry. Avoid cooking too long, or you'll end up with mango chips!
  5. Store leftovers (if there are any!) in an airtight container. Since they are preservative-free, enjoy them within a few days.

HINT :  *If i were to do this again i would've bought the mangoes earlier to give them even more time to ripen. The more ripe they are, the better they taste.
             * Some of the slices turned out more chewy than others, next time i would concentrate on making them all the same size


 Nature's Candy: DIY Dried Mango. (n.d.). Retrieved January 22, 2015, from http://www.popsugar.com/fitness/How-Make-Dried-Mango-30459610

Bannock on a Stick

By: Max Guthrie and Yacoub Abdallah
January 21, 2015

Rating:****

Ingredients:

-3 cups of flour
-1 tablespoon of salt
-2 tablespoons of baking powder
-1/4 cup butter melted
-1 1/2 cups of water

Instructions:

1.  Measure flour, salt and baking powder into a large bowl.  Stir to mix well.  Pour the melted butter and water over the flour mixture.  Stir with fork to make a ball.

2.  Turn dough out on a lightly floured surface, and knead gently until it's mixed well.  Pat into a flat circle 3/4 to an inch thick.

3.   Roll each dough ball thick enough to stay on the stick.  Cook over the open fire for about 15-20 minutes and continue to turn so it cooks evenly.

4.  Try spreading a flavor (nutella or jam) over your bannock for extra flavour.

Tips:  Bring extra flour to add if  bannock mixture is too sticky.


Dehydrated Apple Chips

Rating:****
Max Guthrie
January 21, 2015

Ingredients:
-3 to 4 crisp, ripe, organic apples
-1 tablespoon of ground cinnamon
-1 tablespoon of sugar

Instructions:

Slice off the top, stem side, of the apple and then slice the apple into thin rounds, somewhere between 1/4" to 1/8" thick.  Remove the seeds.  Peel can be left on or taken off.

Toss the sliced apples with cinnamon and sugar and arrange in a single layer in your dehydrator or onto a parchment paper-lined backing pan.

DEHYDRATOR:  Turn the dehydrator to 135 degrees F.  Allow the apples to dehydrate for 6 to 8 hours or until they are dried and as crisp as you want.

OVEN:  Preheat the oven to 200 degrees F.  Bank the apple slices or 1 hour, then flip them and allow to bake for another 1 to 2 hours until the chips are no longer moist.  Flip the chips occasionally.

Store the apple chips in an airtight container to maintain crispness.


Source: http://tasty-yummies.com/2014/10/14/how-to-make-dehydrated-apple-chips/


HINT:  Some of the thicker apple slices were still a bit moist so I should have increased the cooking time by another hour.

Banana Chips

Dehydration recipe: Banana Chips
Adam Johnson, Yacoub Abdallah 
Rate: ****
Ingredients:
- 2 bananas
- 1 lemon (juice)
- cinnamon (optional)
- olive oil

Instructions:
- Turn oven to 210 degrees Fahrenheit
- Thinly slice bananas, how thin you slice is up to you
- Coat the banana slices in lemon juice
- Place slices on parchment paper or a cookie tray; coat surface with olive oil
- Add cinnamon or a flavour of your choice if you wish
- Bake bananas for about 7 hours; check to ensure they are dry
- Once they are dehydrated, they are ready to serve

Note: This is a simple recipe; bananas and lemon juice are the only necessary ingredients.
  

Thursday, January 15, 2015

Bannock on a Stick

Bannock

By: Abdiel Benn Jr and Quinn Bisson


Ingredients:

-3 cups flour -1 tsp salt-2 tablespoons baking powder-1 tsp cinnamon-1.5 cup water


Steps:

-Mix together flour, salt, baking powder and cinnamon in a large bowl.

-Add in water and mix it together, until it's smooth and there are no lumps left.

-Put it on a stick, and cook it in the fire, until its cooked all the way through.


Tuesday, January 13, 2015

Stick Bannock

Bannock on a Stick
rating: ***

- 3 cups flour
- 1/4 cup butter
- 1-2 teaspoons salt (to taste)
- 1 1/2 cups water
- 2 tablespoons baking powder
- 1-2 teaspoons sugar (optional)
- Nutella, peanut butter, jam, or garlic butter

1. Mix dry ingredients into bowl. Pour water and melted butter over the mixture. Stir into a lump.

2. Place dough onto a floured cutting board or flat space. Separate the dough into balls. 

3. Roll each dough ball around a stick, ensuring it will not fall off. Cook for 10-20 minutes over an open flame, depending how close to the fire you cook. Ensure the inside is cooked, wait until dough is hard.

4. Cut open the bannock and add a flavour of your choice. Enjoy!

- Tips: Be sure to cook long enough; cut open the the bannock while it's cooking. If the inside is still soft, keep cooking.
- Bring extra dry ingredients like sugar and flour in case the dough gets too sticky.

Bannock on a Stick Recipe

Rating ****

Preparation: (assuming you have a fire going)


  • First we took a handful of mix and added water until it got to a nice soft doughy consistency, but also with enough water to keep it together.


  • When you have it into a ball of the desired size coat the outside with flour or more mix to prevent it from sticking to your hands.


  • Take a stick or rod that can be held over the coals of a fire and coat the end in flour or mix to prevent it from sticking to the dough.


  • Skewer the ball.


  • Hold the stick over the fire slowly rotate it to make sure the dough is cooked evenly.


  • When the dough is lightly browned and cooked all the way through remove it from the stick.


  • At this point you can add any seasoning you want(We added jam and butter).


Ingredients:
-3 cups of flour
-dash of salt
-1 tsp baking powder
-2 tbsp lard or crisco
-water


What to improve upon:
One problem we encountered was adding too much water to the mix. To fix this the next time we add water slower, trying to keep the dough at a better consistency. We also found that it is important to spread the dough thin over the stick. We put it on a bit too thick and i caused the dough not to be fully cooked all the way through.

Thursday, January 8, 2015

Bannock on a Stick

Rating: ****

·                                 2 cups (500 mL) all-purpose flour
·                                 1 tbsp (15 mL) baking powder
·                                 1/2 tsp (2 mL) salt
·                                 1/2 cup (125 mL) milk
·                                 1/2 cup (125 mL) water
·                                 1 tbsp basil
·                                 1 tbsp oregano
·                                 1 tbsp garlic powder

Mix all dry ingredients together in a mixing bowl, and then add the milk and water.
Hint: Bring extra flour because the dough can get too sticky.


(2015) Transcontinental Media G.P. From: http://www.canadianliving.com/food/bannock.php